Tools Management
Easily add tools, assign custody to users, check-in tools, transfer tools between stores, maintain tools and fulfill requests from field, all from a single place!
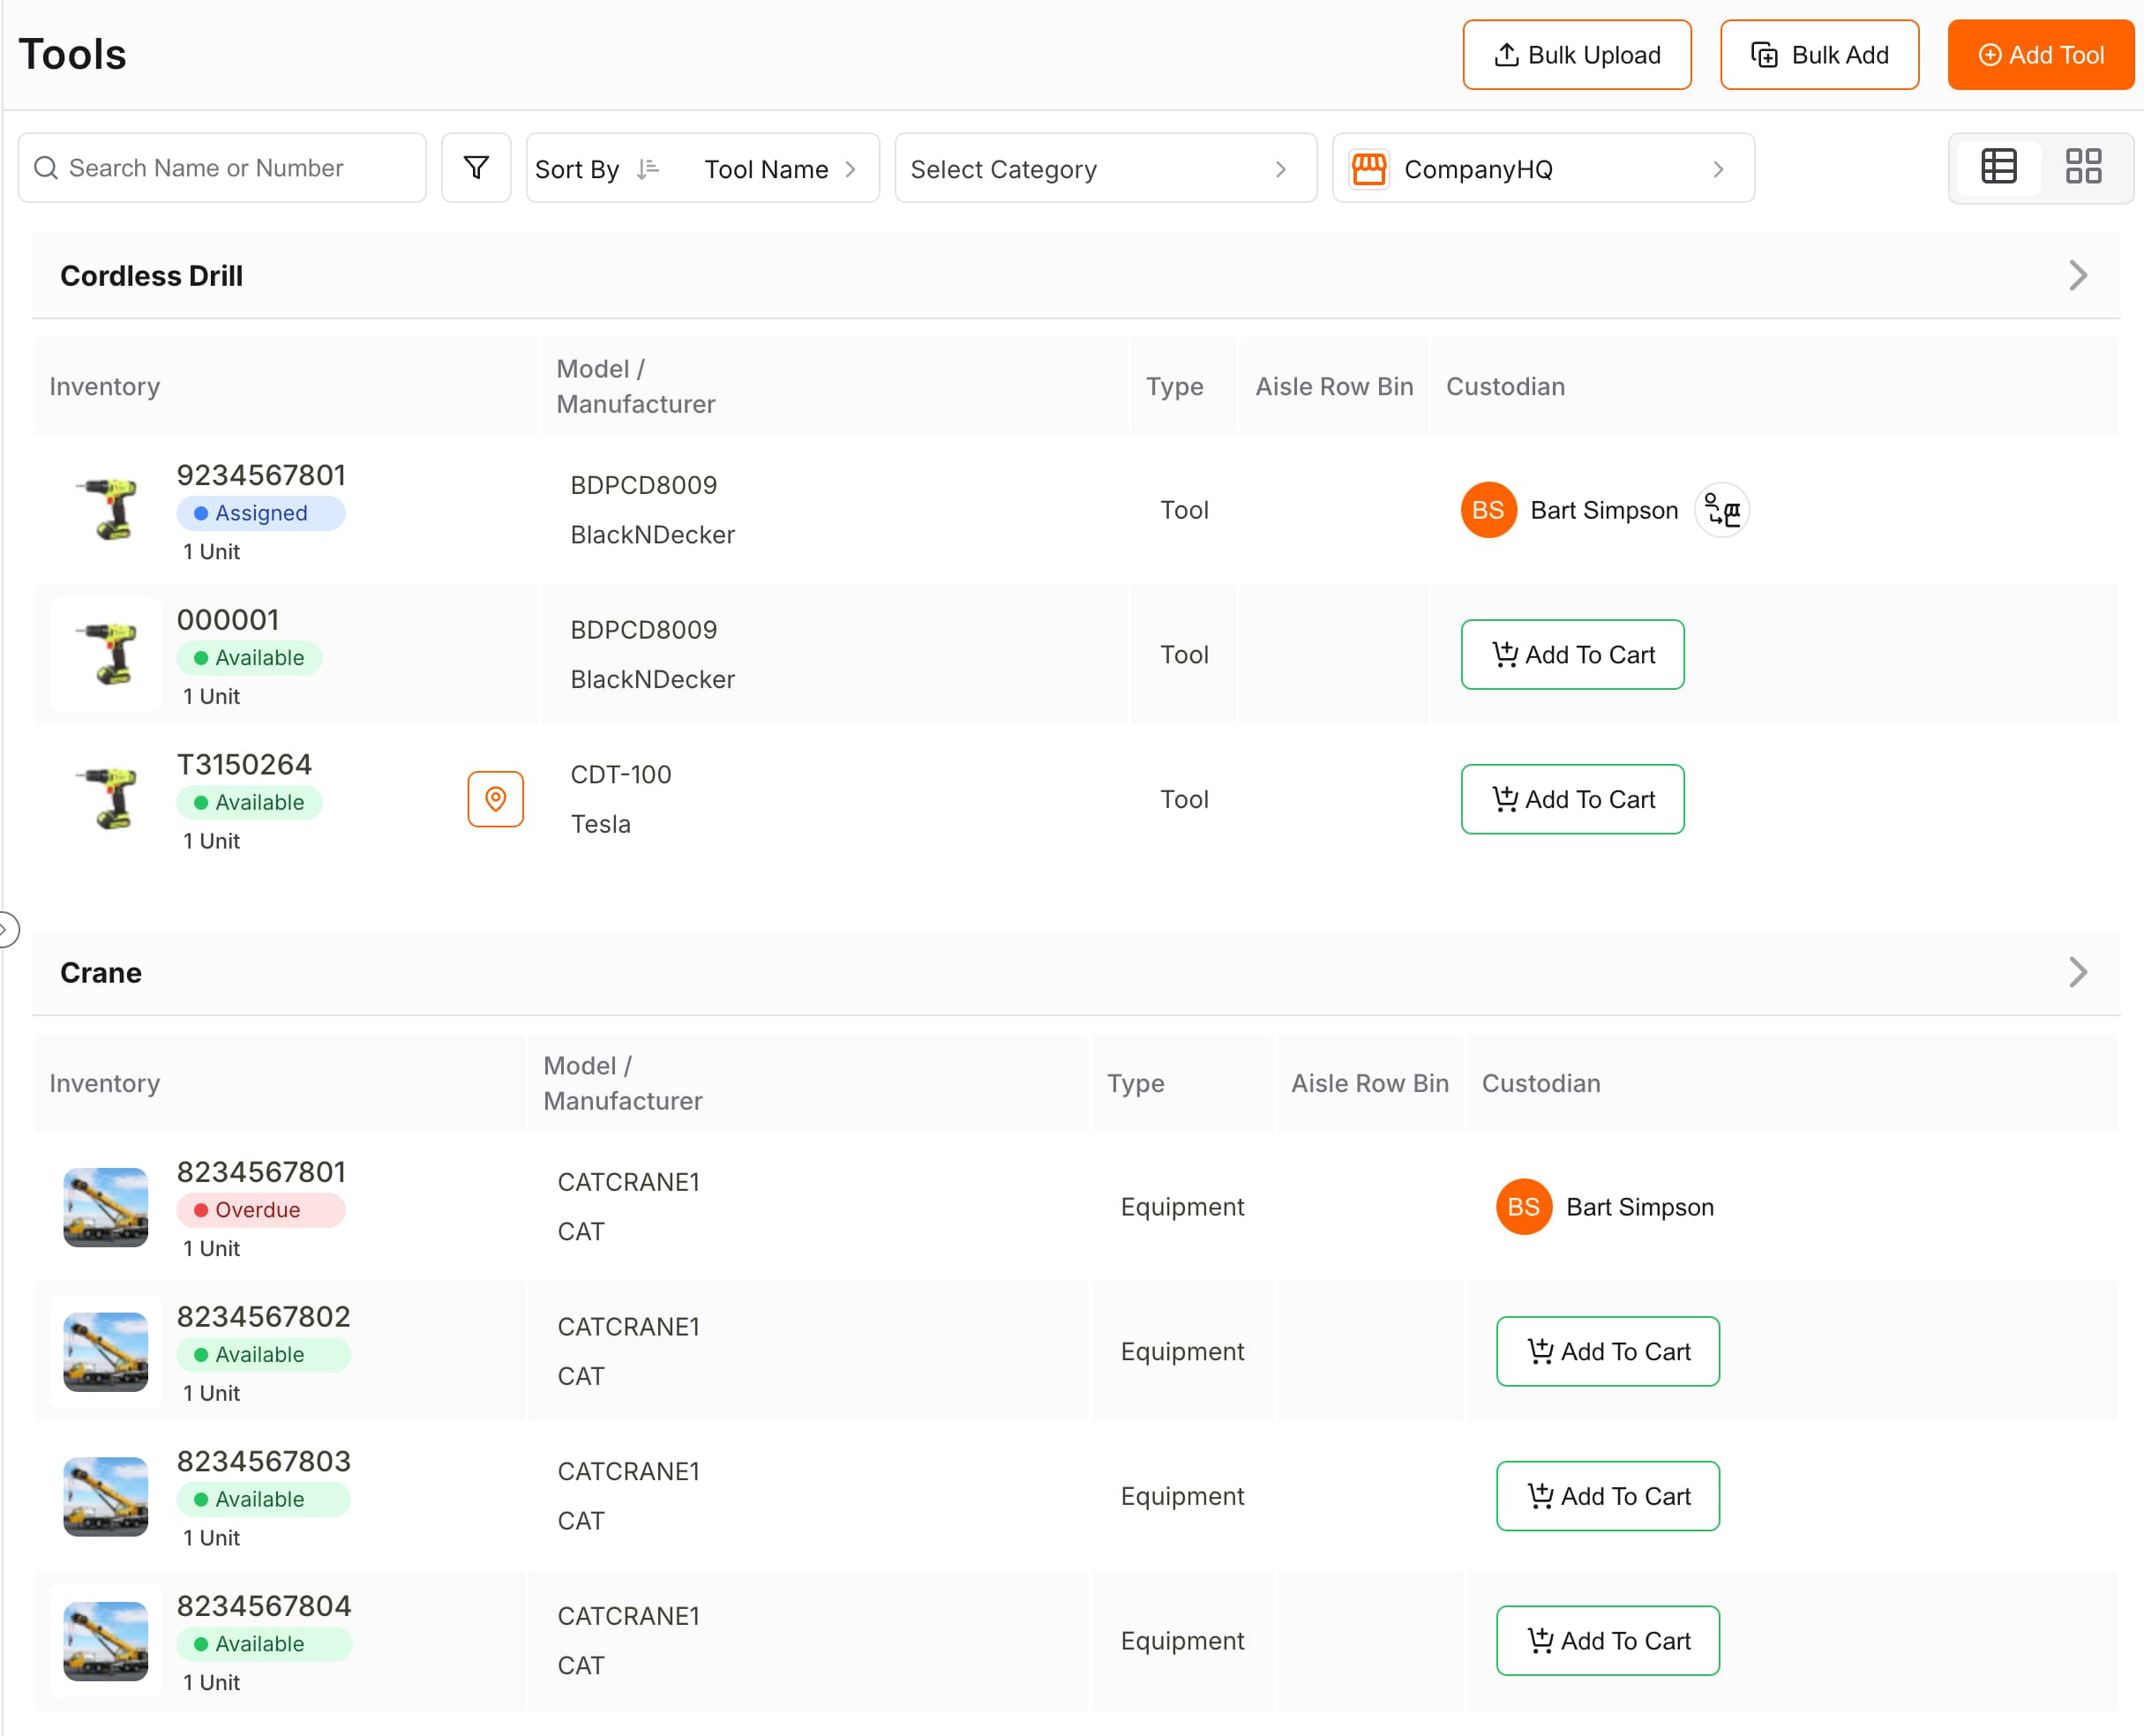
Tools tab shows list of all tool inventory.
You can quickly locate any tool using simple search functionality, it searches against tool name, tool description and inventory barcode.
Advance Filters allow you to search against specific tool parameters:
- Tool Name
- Tool Description
- Barcode
- Manufacturer
- Model
- Status (All/Available/Assigned)
To quickly see Consumables, just select Consumable from drop down for Inventory Type.
You can also utilize Category filter to narrow down tool list. Category filter allows you to filter list based on tool attributes like Power Tools, Safety Equipments etc.
Use Location filter to see tools located in specific location. (subject to appropriate rights)
Tools tab allows you to take variety of actions on tools, all based on simple shopping experience. Just click Add To Cart next to the tool and take appropriate action.
You can take the following actions on tools:
- Add Tools
- Assign Tools to user
- Check-In tools
- Transfer tools to another store
- Maintain tools
- Fulfill Tool Requests from Field
- Delete One Tool
- Delete All Tools from a Tool Group/Folder
- Tool Group/Folders
- Kits
- Configure Barcode Generator
- GPS Tracking
Add Tools
There are multiple ways to add tools:
Snap To Add
Add new tool using AI.
- Navigate to Tools tab and click
Add Tool. - Upload, drag and drop or Snap Photo of tool you want to add. Our AI driven vision will process the photo and generate tool details. Tool Details are shown to verify / edit.
- Click
Addto save the new tool
Bulk Photos to Tools
- Navigate to Tools tab and click
DropDownnext to Add Tool and selectBulk Photos to Tools. - Upload or drag and drop photos of tools you want to add. Our AI driven vision will process the photo and generate tool details and save the tool.
Bulk Add
The Bulk Add Tool streamlines the process of adding multiple tools or equipments with shared characteristics. When you receive a shipment containing multiple units of the same tool, you can utilize this feature to efficiently create records for each individual item.
- Navigate to Tools tab and click
Bulk Add. - Enter the details of the item you want to add
- Tool Name
- Comma Separated list of barcode or provide Prefix, Start, Suffix and quantity to add.
- Optionally select Inventory Type, enter Manufacturer and Model and upload a Photo.
- Click
Addto save the new tools.
Bulk Upload
Bulk Upload allows you to upload a CSV file with tool details. You can download template file from Tools tab > Bulk Upload. Bulk Upload is great way to enter lots of tools.
You will need to upload a CSV file with the following columns:
| Fields | Is Required | Description |
|---|---|---|
| Tool Name | Required | Name of Tool in the Catalog. |
| Inventory Type | Required | Type of Asset, Tool (aka Serialized), Bulk, Consumable, Equipment. |
| Manufacturer | Optional | Name of tool manufacturer. |
| Model | Optional | Model number of tool |
| Barcode | Optional | Unique identification number for Tool. |
| Total Quantity | Optional | Quantity of Tool for Bulk and Consumable (always 1 for Equipment and Tool/Serialized) |
💡 You can download template file to start with from the Tools tab > Bulk Upload
Steps to Upload
- Navigate to the Tools tab. [shift-t]
- Click
Bulk Uploadand select CSV file to upload or drag and drop the file. - View the parsed file. Once you are satisfied with the data, click
Upload.
Advanced Bulk Upload
Advanced Bulk Upload allows you to upload a CSV file with tool details. You can download template file from Tools tab > Advanced Bulk Upload (use drop down next to Bulk Upload). Advanced Bulk Upload is great way to enter lots of tools and auto generate all the related fields. Upload will auto create Locations, Category/Sub Category and Vendors.
You will need to upload a CSV file with the following columns:
| Fields | Is Required | Description |
|---|---|---|
| Tool Name | Required | Name of Tool in the Catalog. |
| Catalog Number | Optional | Number used to identify tool in the Catalog. |
| Catalog Description | Optional | Tool Description. |
| Inventory Type | Required | Type of Asset, Tool (aka Serialized), Bulk, Consumable, Equipment. |
| Inactive Flag | Optional | If the tool is no longer active, enter Yes |
| Unit Of Measure | Optional | Unit of Measure for Quantity of Tool |
| Category Name | Optional | Tool Category |
| Category Code | Optional | Code for Tool Category |
| Category Description | Optional | Description for Tool Category |
| Parent Category Name | Optional | Name of Parent Tool Category for hierarchial list of tool categories |
| Manufacturer | Optional | Name of tool manufacturer. |
| Model | Optional | Model number of tool |
| Barcode | Optional | Unique identification number for Tool. |
| Serial Number | Optional | alternate identification number |
| Aisle/Row/Bin | Optional | Location where the tool is kept |
| Lat | Optional | GPS Latitude |
| Lon | Optional | GPS Longitude |
| Vendor Name | Optional | Name of vendor from whom tool was procured |
| Purchase Date | Optional | Date of tool procurement. Date must be in YYYY-MM-DD format |
| Warranty Date | Optional | Date till tool is under Warranty. Date must be in YYYY-MM-DD format |
| Purchase Price | Optional | Price of tool |
| Price Currency | Optional | Currency for Price |
| Is Rental | Optional | Owned or Rental. Enter Yes for Rental |
| Rental Rate Unit | Optional | Daily/Weekly/Monthly/Quarterly (etc) |
| Tool Status | Optional | Available, Repair, Retired |
| Total Quantity | Optional | Quantity of Tool for Bulk and Consumable (always 1 for Equipment and Tool/Serialized) |
| Location Name | Optional | Tool Store Name |
| Start Date | Optional | Date from which tool will be Available, useful for Equipment. Date must be in YYYY-MM-DD format |
| End Date | Optional | Date till when tool will be Available, useful for Equipment. Date must be in YYYY-MM-DD format |
💡 You can download template file to start with from the Tools tab > Advanced Bulk Upload (use drop down next to Bulk Upload)
Steps to Upload
- Navigate to the Tools tab. [shift-t]
- Click drop down next to Bulk Upload and select
Advanced Bulk Uploadand select CSV file to upload or drag and drop the file. - View the parsed file. Once you are satisfied with the data, click
Upload.
Inventory Types
Inventory of items is classified based on type of asset. There are 4 different types in ToolWorks: Tools, Bulk Items, Consumables, and Equipment.
Tools:
Tools are items that you want to track and manage individually. Each will have its own unique barcode or asset tag. They are usually assigned for long duration, and are required to be returned. Example: Hammer Drill, Miter Saw.
Tools are check out to user, transferred to job site, checked in, maintained, purchased, audited, etc.
Bulk Items:
Bulk items are tools that are tracked in bulk rather than individually. Instead of each item having unique barcode, all items in the group have same barcode or asset tag. They are less valuable than Tools, but you still want them to be returned. Example: Shovels, Chairs
You can also think of Bulk items as items that have a count or Counted Items
Just like Tools, Bulk Items are checked out to user, transferred to job site, checked in, maintained, purchased, audited, etc.
Consumables:
Consumables or materials(supplies) are items that are consumed over time and permanently removed from the stock count once utilized. Like Bulk items, Consumables are tracked as a group rather than individually, and are not required to be returned. Example: Welding Rods, Water Bottles.
Days consumables are counted towards custodian inventory can be configured in the settings, and defaults to 8 days. Enterprise user can configure this for each consumable by setting field Consumable Days.
Consumables are checked out to user, transferred to job site, purchased, audited, etc.
Equipment:
Equipment are assets that are tracked individually like Tools, but unlike tools (which are given out for long duration), they have a fixed duration for which they are reserved. Example: Forklift, Scissor lift.
When assigning custody of equipment type to a user, a start date and return date are required. While it is common to think of equipment as items that move, you can also think of them as assets that are reserved for a fixed duration, and can be any asset!
Equipment are reserved, transferred to job site, checked in, maintained, purchased, audited, etc.
Assign Tools to user
- Navigate to Tools tab. [shift-t]
- Find tool and click
Add To Cart. (repeat for each required tool) - In the Cart, click
Assign, enter user and clickCheckoutto assign tool custody to user.
For reserving equipments, click Reserve in the Cart.
Check-In tools
- Navigate to Tools tab. [shift-t]
- Find tools to check-in and click
Add To Cartfor each tool you want to check-in. - In the Cart, click
Check In, enter user and clickCheck Into return tools.
Transfer Tools to another store
- Navigate to Tools tab. [shift-t]
- Find Tool and click
Add To Cart, for all tools that need to be transferred - In the Cart, click
Transfer, enter store details and clickTransferto transfer tool to another store.
Maintain Tools
- Navigate to the Tools tab. [shift-t]
- Locate tools and/or equipments that need maintenance and click
Add To Cart. - In the Cart, Click
Maintainto create maintenance order and enter the details.
- Select Type of Maintenance
- Enter Start and End dates
- Assign User that will perform the service (optional)
- Enter notes for maintenance personnel (optional)
- Click
Scheduleto schedule maintenance order. Alternatively, clickCheck Outto assign equipment custody to user and start the work order.
Fulfill Tool Requests from Field
- Navigate to the Tools tab. [shift-t]
- Locate request tools and click
Fulfill. - Pick requested tools and click
Ready. This will notify users that tools are ready to be picked up. - Once you have given tools to user, click
Completeto complete the request.
Tools provides a centralized location to manage tools, maintain tools, check-in tools, and fulfill tool requests from field. Just Add To Cart and take action.
Delete One Tool
- Navigate to the Tools tab. [shift-t]
- Find tool and click to view details, and then click
Delete. - Click
OKto confirm. - If tool is deleted, you will be redirected to Tools tab.
- If tool is not deleted, you will be shown error message. If you still want to delete, please change status to
Retiredand then clickDeleteagain.
Delete All Tools from a Tool Group/Folder
- Navigate to the Tools tab. [shift-t]
- Find tool and click on Tool Name (group/folder) to view common group details, and then click
Delete. - Click
OKto confirm. - If tools are deleted, you will be redirected to Tools tab.
- If tool are not deleted, you will be shown an error message.
💡 This will delete all tools for the selected tool group/folder, effectively removing the tool. It may not work if one or more tool is already assigned or checked out to user or have audits. In those cases, if you still want to delete, please change status to
Retiredon individual item and delete each of them.
Tool Group/Folders
ToolWorks does automatic grouping of similar tools based on the Tool Name. This grouping allows you to easily see how many tools of a given type are in the inventory. So if you have 20 tools of type Cordless Drill 20v , you can see them under "Cordless Drill 20v" folder and when you expand folder you will see 20 individual tools, they may be from different manufacturers or models, but essentially they are the same tool. This also makes it easy to setup common properties for the group, like "Restock Quantity", which will trigger "Out of Stock" and/or "Low Stock" notifications.
Here are properties of the automatically created tool group/folder:
- Tool Name
- Catalog Number
- Description
- Inventory Type
- Unit of Measure
- Restock At Quantity
- Category
- Is Inactive
- Is Kit
- Photo
- Documents
You can also think of them as entries in a Catalog and tools as actual inventory for each of those entry in Catalog!
Kits
Kits are special type of tools that can contain or group other tools, acting as tool boxes designed for specific purposes. Learn how to create kit, add tools to kit and transfer kit.
Configure Barcode Generator
You can configure the system to automatically generate barcodes for tools as per your requirement. To configure, navigate to Setting tab and then click Configuration. Look for Barcode Generator Configuration.
ToolWorks supports two types of barcode generation: Standard and Advanced.
Standard
Majority of times, barcodes are just numbers. Default configuration is "~10000", which starts barcode from 10000 and increment for every new tool.
Advanced
You can configure a prefix so that barcode reads as Prefix + Number. For example, if prefix is TS- then tool barcodes will look like TS-10000. To configure a prefix, change default configuration from ~10000 to TS-~10000. Note ~ is required, it is used as a seperator.
Type Based
Premium plan customers can further configure barcodes to be different by inventory type. Change default configuration from ~10000 to ~10000,20000,30000,40000. Types are Tool, Bulk Tool, Consumables and Equipment, each with their own unique barcode start number, so in this case Tools with start from 10000, Bulk Tools from 20000, Consumables from 30000 and Equipment from 40000. Prefix can also be added if required.
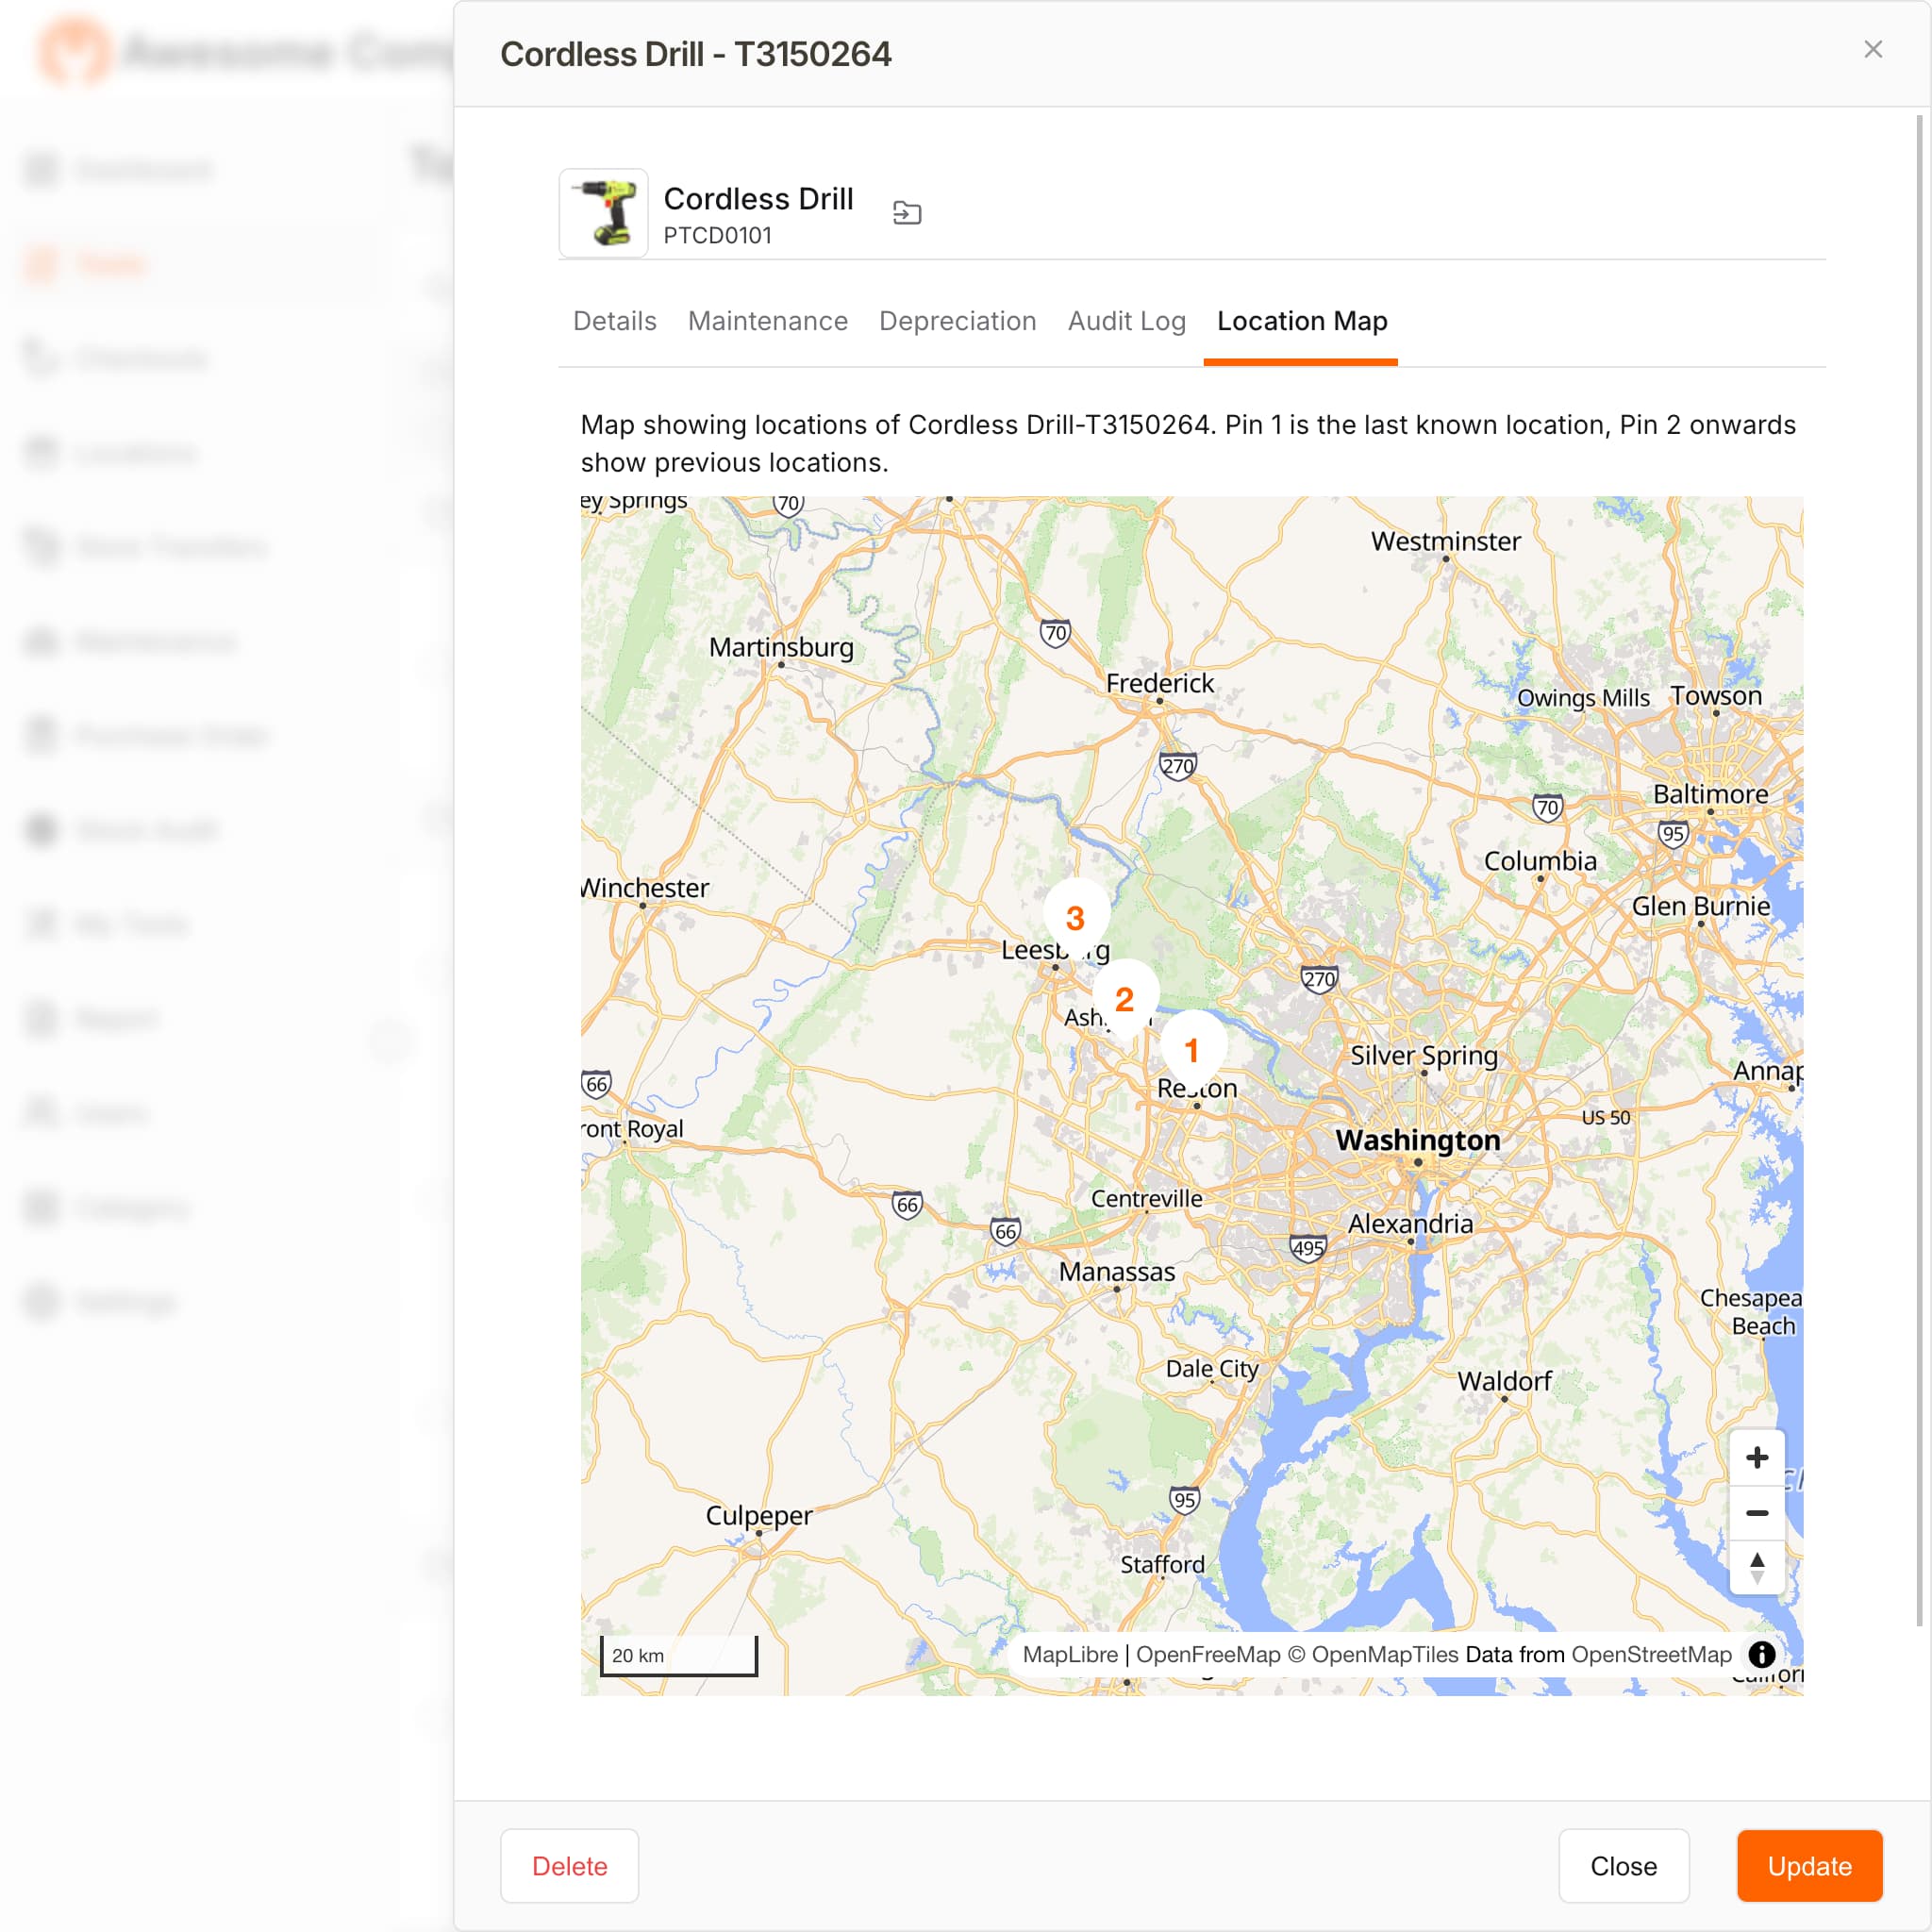
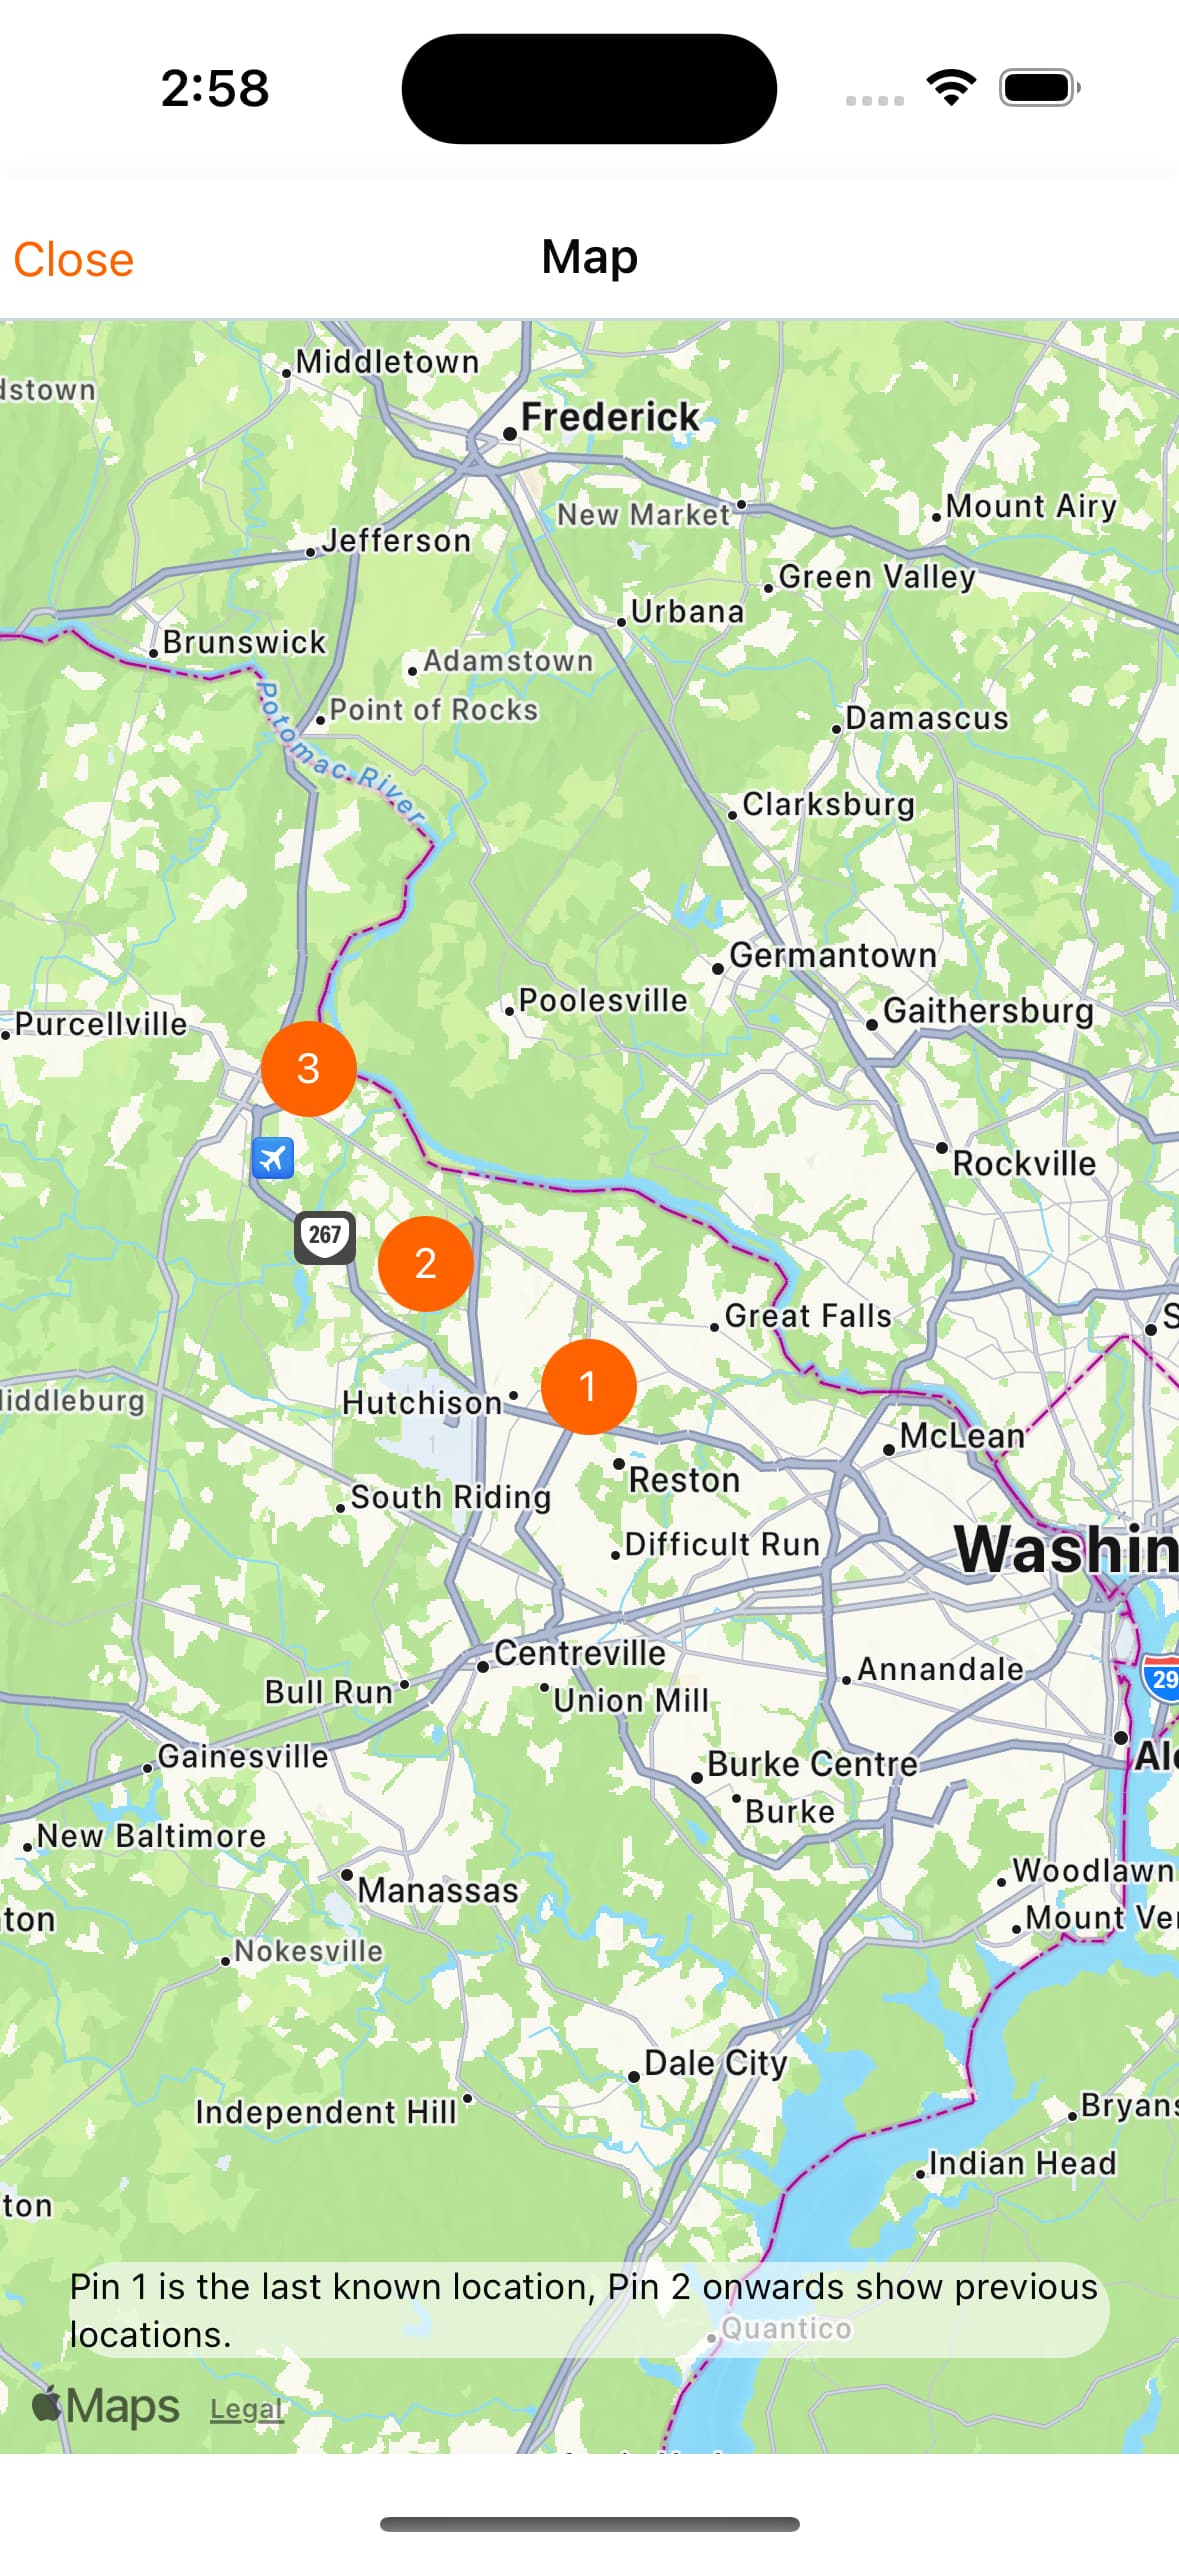
GPS Tracking
GPS Tracking is available for all tools and equipment. You can view the GPS location of the tool on the map. To view GPS location of tool, you need to enable GPS tracking in the settings.
- Navigate to Settings tab. [shift-s]
- Click Configuration and Enable GPS tracking.
- Click
Saveto save changes.
Once enabled, every time you scan a tool, the GPS location will be recorded. ToolWorks automatically keeps history of GPS location for each tool. GPS scan is saved to history when tool moves from one location to another by 12 feet or more. This is to avoid unnecessary GPS tracking records when tool is moved within the same location.
You can also manually add GPS location by entering Latitude and Longitude or by clicking Get Latitude/Longitude with GPS in the tool details page on the mobile app.
To view historical GPS location, navigate to Tools tab and click on the tool inventory to view details. Then select Location Map tab. You will see a map with the GPS locations of the tool.